Information About Various Materials And Techniques
This page is a collection of information I have found useful to various Scouts in the past as they have worked through the planning and approval process. It is not intended to be an authoritative source but rather a collection of useful (maybe) comments. Many other sources of information are available and should be consulted. Be sure you are familiar with the materials, tools, and techniques you will be using. Searching the web for information about projects similar to what you are planning can get you lots of good information about materials, processes, techniques, and designs.
This page is very much a work in progress. If you find a good source for information, or think of another section that should be added, please let me know by e-mail.
Many good books and web sites exist with beginner's information to do-it-yourself projects. My favorite is Reader's Digest's New Complete Do-it-yourself Manual, available from most book sellers.
If asked if you are familiar with this material from this web site, you should know the secret word is PICKLES.
Information is available here on:
Drawings, Dimensions, and Instructions
Rebar (Concrete Reinforcing Bar)
Age Guidelines for Tool Use and Work Elevations or Excavations
Building Permits and Approvals
Aerial Photographs and Topographic Maps
Most lumber is available in "nominal" sizes. You should be aware that the "nominal" or name size is not the actual dimension. For example, a 2 x 4 is not 2" by 4", and is not called a 2" x 4" and is not written 2" x 4". If the dimensions are important, be sure to measure the lumber where you are planning to buy it to get the actual dimensions. Also be aware that a 2 x 4 x 8' might be slightly longer than 8'. If you are not planning to cut it to length, and the length is important, you should probably verify the length.
A typical 2 x 4 is about 1½" x 3½", but this varies somewhat so you should always measure the lumber you are going to purchase to be sure. Hardwoods for furniture or other special applciations are typically somewhat larger than this. Some lumber and timbers are sold "rough cut" and will match or even exceed the nominal dimensions.
Some specialty woods such as cypress may actually be finish cut to the nominal dimensions, i.e. a 2 x 4 may be 2" x 4". Ask, or measure, to be sure.
Lumber is available in different species (Pine, Spruce, Hemlock, Oak, Maple, and others). It is also available in various grades (Clear, Number 1, Number 2, ...). Talk to someone who can help you select the proper species and grade for your project. Go look at the wood you are considering to see if the grade being offered is acceptable for what you want to do with it.
If you are cutting multiple pieces from a single piece of stock, remember that when you cut it with a saw, the saw removes some width. If you need 2 pieces from a single piece of stock totaling less than the total length, you can measure from each end and then be sure the person cutting knows which side of the line is the scrap. You need to decide how critical the dimensions must be held. If you are cutting pieces for a retaining wall, it probably does not matter. If you are making a piece of furniture, dimensions may need to be very exact.
If you are cutting a number of pieces of lumber, one of the best ways to describe the task is with a cutting list that lists the purchased piece and how many pieces of what sizes get cut from it. If you are cutting a number of different length pieces from one purchased piece, a diagram might be helpful.
If you are cutting pieces of lumber with angle cuts on one or both ends, it is often a good idea to have a large scale (use a full page for each) diagram of each cut piece showing the angles, dimensions, and any other details. Do not expect your workers to extract this information from an assembly diagram of the finished construction project.
Be sure you can describe how to lay out and mark the wood for cutting, and how it will be cut.
Drawings, Dimensions. and Instructions
Your drawing, dimensions, and instructions should clearly show describe how each piece in your project is made and how the pieces are assembled.
If you are cutting materials that are anything more complicated than cutting a board to a specific length (probably best documented with a cutting list), probably each more complicated piece should have its own drawing or drawings with angles, measurements, and other information needed to make that piece. Be sure you have defined what each piece is made from. For example, if you are buying 8' and 12' 2 x 4's, be sure it is clear which pieces are cut from 8' pieces and which are cut from 12' pieces. If you are using 2 x 4's, 2 x 6's, 2 x 10's, and plywood, which pieces are made from each material. If you are using plywood, which way should the "good" side face.
Assembly instructions should include details of how each piece goes together. As an example, try this exercise:
If you have two pieces of 2 x 4 that are 2' long and two pieces of 2 x 4 that are 1' long and you are going to put them together in a rectangle, what are all the possible outside dimensions for that rectangle, and how would you describe and document the assembly instructions for each? (Hint: 1' x 2' is not one of the basic answers.)
If you did not come up with the following six answers, you should to try experimenting with four pieces of scrap lumber before you try writing your instructions.
1' 3" x 2'
1' x 2' 3"
1' 1½" x 2' 1½"
1' 7" x 2'
1' x 2' 7"
1' 3½" x 2' 3½"
Each of these six cases would produce a different result, and would have different drawings and instructions. Be sure the level of detail in your documentation would distinguish between these six cases.
Remember that your instructions, along with the drawings, material lists, tool lists, supplies lists, and other documentation, should allow someone else (and more importantly - YOU) to pick up the documentation and carry out the project exactly as you have planned it, using unskilled labor like you will be doing. This documentation is how you demonstrate that you know how to carry out the project successfully.
At the very least your drawings should be drawn on graph paper with a straight edge. Be sure to indicate the Scale on the drawing (such as 1/4"=1') The best scale will depend on how large an object you are drawing. Make the drawing as large as possible to show the best detail.
If you have access to, and the willingness to learn, a CAD (Computer Aided Drafting) program, this will allow you to make even better, clearer, more accurate drawings. There are many free CAD programs available on the internet.
In many cases, the most useful drawings are sets of three drawings from mutually perpendicular directions such as front, side, and top views. In some cases these are "slices" through the object you are drawing, not from the outside. In most cases isometric drawings (3 dimensional views) are harder to draw, are difficult to dimension, and provide less hard detail than the perpendicular "flat" views.
In your drawings, be sure to show the individual pieces, and show the material thickness. Do not do just an outline drawing. Accurate scaling will help find errors in your dimensioning.
If you have not had any mechanical drawing class, talk to your high school shop teacher. They may be able to give you some help, and may be willing to review and critique your design. Your Eagle Coach may also be able to help you.
If you are making any pieces more complex than lumber cut to length, it is often helpful to do a drawing of individual pieces. This is especially helpful for pieces with angled ends, groves or notches, or other fabrication.
Another useful type of drawing is a cutting diagram. This is particularly important for getting multiple pieces out of a sheet of plywood. This diagram shows how the various pieces you want from a sheet should be laid out to minimize waste. If any pieces are other than rectangular, it is important to indicate which side of the plywood is the "good" side. Sometimes it is even useful to do cutting diagrams for lumber as well if several pieces are to be cut from a single purchased piece of lumber.
Many outside construction projects are done with Pressure Treated Lumber. This wood is treated with chemicals to resist rotting and bugs. There are important safety considerations in working with this wood. Be sure to read and understand the safety information available anyplace that sells this wood (ask at the lumber desk, customer service desk, or cashier if you do not see the information hanging near the lumber). Additional information is available at many web sites such as https://www.lumber.com/blog/what-you-need-to-know-about-pressure-treated-wood and https://www.naturalhandyman.com/iip/infxtra/infpre.html. Many other sites are available by searching for Pressure Treated Lumber with your favorite search engine. Be sure you know what material you are planning to use, and how to handle it safely. In any case you should provide dust masks and safety goggles for anyone around while the wood is being cut, and hand washing facilities for anyone who has worked with the wood before they leave, eat, or use the bathroom. These issues should be addressed in the safety section of your plan.
Since January 1, 2004, new chemicals have been used to make pressure treated lumber. The old chemical, Chromated Copper Arsenate (CCA), was made from Arsenic which is very toxic. Most pressure treated lumber is now made with Alkaline Copper Quaternary (ACQ) or Copper Azole (CA) which are less toxic, but introduce new problems. They are both very high in copper. When the wood is in contact with metal fasteners (nails, screws, bolts. connectors, hangers, flashing), a battery effect (electrolysis) is created which corrodes the metal very quickly. It is very important that you use the appropriate fasteners. The best, but the most expensive, is stainless steel. Some, but not all, hot dipped galvanized fasteners are rated G-185 and are acceptable. These should say G-185 or ASTM-A653 or ASTM-A153 on the box. Electro-galvanized fasteners, which are shiny silver in color, are not acceptable and must not be used. Some fasteners are coated with ceramics or other coatings to use with ACQ and CA pressure treated lumber. Some good information on acceptable fasteners can be found at http://buildingadvisor.com/materials/decks-porches/deck-fasteners-connectors/.
Because copper, and thus these treatments, is so expensive, the manufacturers are providing different levels of treatment and thus protection. Each piece of lumber is tagged with what applications it can be used for. If the wood will be in contact with the ground, be sure it is rated for ground contact.
Plywood is graded by how good the surface is for various uses, typically A through D. In most cases the back is one grade worse than the front. For example AB, BC, or CD. Some AC plywood may be available. Some end in X indicating exterior grade glue, such as CDX. The better the surface, the more expensive. Be sure to select and specify the appropriate grade in your plan.
A is typically free of flaws, good for staining or furniture. B has flaws that have been patched with double ended teardrop patches. These will show if stained, but are fine for painting or in many cases for unpainted storage shelves. C has significant knots that generally can not be painted. In most cases this surface should not be used where it is exposed, except in a basement or similar storage area. D surfaces have open holes where knots have fallen out. This is fine for floor underlayment and roofing where it will be covered, but not for general visibility. Look at the material you are planning to use and see what it actually looks like. Will the "bad" side be good enough?
As you design the process of cutting out of pieces, and especially in describing how the pieces will be put together, be sure you specify which is the "good" side and which is the "bad" side.
Hardwood plywood is designed for furniture. This plywood is made of hardwoods and normally has A grade surfaces on both sides. In most cases this is the best material for furniture and cabinets to be used in areas other than storage rooms. It is more expensive than AC or BC plywood, but more available than AC plywood which is very hard to find.
The edges of plywood show the layers of the plywood. It does not paint well, at least requiring extra coats of paint. One technique it to paint the bottom side and the edges and let it dry sitting on cans or blocks of wood, then turn it over and paint the front side and the edges again. This gives twice as many coats of paint of the edges as on the faces. There is also iron-on real wood banding that makes the edge look almost like it were solid wood.
Sign companies use a product called MDO (Medium Density Overlay) board which is a plywood with a coating (overlay) that is smooth and weather resistant. Talk to a sign company about where to get this material locally.
Unless you are using full sheets, or just cutting one piece from a purchased sheet of plywood, it is often a good idea to draw a careful scaled and dimensioned drawing of how to cut the sheet. Remember that corners within the sheet are a little tricky to cut. A circular saw needs to cut beyond the corner on the top to cut all the way to the corner on the bottom. If this overrun is in scrap material it does not matter, but if you need that piece, you will have to finish the corner with a hand saw, saber saw, or something else that cuts straight up and down.
It is often helpful to do a cutting diagram or cutting list. You will buy lumber in standard sizes but may need pieces of various lengths. A list or diagram can describe how to get one from the other.
If you are using any pieces that are not rectangular, it may be a good idea to draw a careful scale diagram of the piece with all the dimensions and other information needed to lay out the piece for cutting. Sometimes a template made of cardboard or other material may be the best way to get the piece made correctly, particularly if you need many of the same pieces. For any cuts that are not square cuts, be sure you can explain how to lay out the piece and get it cut to the exact shape you need.
More information is available in many Do-it-yourself books available from the library or home center, or on the internet. You might try http://www.ehow.com/how_110401_buy-lumber-diy.html, https://www.engineersedge.com/commercial_lumber_sizes.htm (dimension lumber sizes), and many other sites on the web.
Be sure to make allowances for (actual) material thickness. When you draw scale diagrams of the item you are constructing, be sure to show whether the pieces go on top of, next to, in front of, or behind, another piece. When you put dimensions on the drawing, be sure to indicate whether the dimension is inside or outside, with or without the other pieces.
There are lots of types of screws available, and they are excellent for fastening wood together. One local home improvement center has 1200 different kinds of screws (not including bolts, nails, and other fasteners). There is no such thing as a "regular screw". They vary in head shape and drive, length, pitch, material, finish/coating. Each has a proper application. Many written and internet resources describe how to select the right screw. When you have selected the correct screw, be sure to describe the specific screw you plan to use.
Screws are typically described by size (a number, 6 is fairly small, 12 is a very large screw), the head (flat head, oval head, round head, pan head, filster head,...), the drive (Phillips, slotted, square drive, star drive, ...), the material (steel, brass, stainless steel, plastic, ...), the finish (electroplated, bright finish, coated, galvanized, ...), and possibly the specific intended application (deck screws, drywall screws, ...). Your description should fit one specific kind of screw on the shelf and not any others.
Many outside projects will probably use some form of deck screws. These are a screw specifically designed for pressure treated and other outside lumber applications. They typically are a course thread screw with a bugle head (flat top, curved underneath like a bugle bell) with Phillips, square, combination (Phillips and square), or Star (Torx) drive. The square drive, or combination Phillips/square drive is much easier to drive without the screwdriver hopping. Deck-Mate, and some other brands, have switched their screws to a star (Torx, T25) drive, which is even better. The Phillips drive is very difficult to drive with an electric screwdriver, especially for unskilled woodworkers (like your labor) and probably should be avoided. Be sure to get the correct drive bit for your electric screwdriver, although Deck-Mate brand screws (and some others) come with a driver bit in the box. The screws are coated with something to prevent rust and protect from electro-galvanic corrosion in contact with copper bearing treated wood. This used to be a galvanize coating on the screws, although this has largely been replaced with other high-tech coatings available in several colors. The top of the line choice in both cost and durability is stainless steel. Some Home Depot stores carry stainless steel deck screws in 1 5/8", 2 1/2" and 3" lengths. For most outdoor projects requiring screws the Torx drive coated deck screws are the best choice.
There are also Lag Screws (sometimes called Lag Bolts although they are screws not bolts), which typically have a hex head. These are typically larger than most wood screws (up to 10" long and 1/2" diameter). They are great for fastening large lumber pieces together where carriage bolts can not be used. Always use a flat washer under the head of a lag screw. Lag screws normally require a clearance hole the size of the straight part of the shank through the first piece of wood and a pilot hole just smaller than the root diameter of the threaded part. If the lag screw is long, be sure you have a long enough drill bit. It is very important that the holes in both pieces of wood be in a straight line. Do not try to drill the pieces separately and expect that they will line up in position and direction. Always fasten (clamp or temporarily nail) the pieces together and then drill them as one piece.
A relatively new development is structural screws such as FlatLOK, HeadLOK, TimberLOK, and others. These are typically easier to install than lag screws but stronger and better looking. Talk to a hardware expert or study material available on the internet.
In many cases you will buy screws by the pound (usually 1 pound boxes, 5 pound boxes, 25 pound boxes, 30 pound boxes, or 50 pound boxes). From your design you can estimate how many screws you will need (be sure to allow for some defective screws in the box and some lost or damaged screws in the assembly process), but most boxes do not tell you how many screws are in a pound. The following table is for one brand of exterior (coated steel) screws, but gives some idea of how to convert from number to pounds. Manufacturer's web sites may have this information as well.
#7 x 1 1/4" 228
#7 x 1 5/8" 142
#8 x 2" 99
#8 x 2 1/2" 84
#8 x 3" 69
#9 x 3 1/2" 57
These numbers vary widely by manufacturer, and of course are very different for different types or sizes of screws.
If you are installing screws near the ends or edges of the wood, or you want to make the installation process easier, a pilot hole may help. A chart of recommended pilot hole sizes is available at https://www.boltdepot.com/fastener-information/Wood-Screws/Wood-Screw-Pilot-Hole-Size.aspx. You would probably be using straight bits.
If you are having trouble driving the screws (usually not a problem with electric screw guns), rubbing a little bar soap in the threads first may help.
There are lots of types of nails available, and each has a particular application. The size of most nails is measured in pennies (originally the price per hundred, abbreviated d, the name comes from the British penny but the abbreviation comes from the Roman denarius). Common nails range from 2d (1" long) to 60d (6" long). Larger nails are called spikes, and are measured by inches. (There are no 9 inch nails except in the music business). For a given type and penny size (length), the diameter is normally defined, but there are some exceptions.
Like screws, there are many types including common nails, finishing, box, casing, cut flooring, ring, spiral, concrete, upholstery, roofing, and duplex head nails, as well as brads, tacks, and staples. Each has a particular application.
Most nails are steel, but aluminum and stainless steel are sometimes available. Most nails are "bright" finish (unfinished), but some nails are available electroplated, oil dipped, or hot dipped galvanized.
In most cases, you should nail through the thinner material into the thicker material. 2/3 of the nail should be in the thicker material. In any case be sure that the nail will not stick through the second piece, unless you plan to bend (clinch) the end.
From your plans and assembly methods you can estimate how many nails you will need. Always allow for some extra. Most nails are sold by the pound. For typical common nails, the number per pound may be estimated from the table below:
2d 1" 840
4d 1 1/2" 300
6d 2" 170
8d 2 1/2" 105
10d 3" 65
12d 3 1/4" 60
16d 3 1/2" 44
20d 4" 30
30d 4 1/2" 22
40d 5" 18
60d 6" 10
There are many ways to fasten to masonry products (Concrete, brick, mortar, concrete block). They vary widely in strength, ease of application, shear vs. pull-out strength, and what type of masonry they can be used with. Toggle bolts are probably the strongest fastener in concrete block, but are more work to install than some others and must be positioned between the block webs. There are several products that install a plastic, lead, or steel wedge into a drilled hole with a screw or stud. These all have much better shear (parallel to the wall) strength than pull-out (perpendicular to the wall) strength. If you are building the wall or pouring concrete, "J" bolts set in the wet masonry are very strong but must be placed correctly when the masonry is installed. There are fastener kits that involve drilling a hole and then using epoxy to set an anchor in the hole. These are very strong but more expensive and messy to install. There are several brands of a special screw that can be screwed into a precisely dimensioned drilled hole directly into concrete, block, or brick. These must be installed very precisely, but when properly installed they have good holding power.
Whatever type of fastener you select, be sure that it is appropriate for the material it will fasten to, the material to be attached, and the loads to be applied. Each requires the proper tools and techniques to install it properly. Be sure you know how to install the fastener and have used an appropriate fastener for the job you want it to do.
Many Scouts planning Eagle projects have struggled with hinges. In planning your design, be sure to figure out what type of hinge you need and how it will work. Be sure to clarify the exact hinge, where each side will be fastened and how it will be fastened. Draw a large scale drawing of the mounted hinge with the door attached in both the open and the closed position. Many Scouts have found that when they mount the hinge as they first envision, the door will not open at all or will break off the hinge when opened. There are many types of hinges beside the typical butt hinges used for typical room doors and sold at the local home center. Some difficult hinge needs may be solved by using pivot hinges (try an internet search if you are not sure what these are or where to buy them).
Be sure there is always something to stop the door from swinging too far open and breaking the hinge. This may be a wall or an adjacent cabinet. If there is nothing else to stop the door, you may need to put a chain or other restraint to prevent the door from opening too far.
Most of the hardware needed for Eagle Scout projects is available at your local hardware store or home center. One local home center carries about 20,000 different items just in the hardware department. There may be some time when you need a piece of unusual hardware such as a hinge, latch, or fastener. The internet has become a wonderful source for information and materials. If you are looking for a specialized solution, try McMaster-Carr at www.mcmaster.com, Moore Industrial Hardware at www.mooreindhardware.com, MSC Industrial Supply at www.mscdirect.com, the Fastener SuperStore www.fastenersuperstore.com, McFeely's at www.mcfeelys.com, and Bolt Depot at www.BoltDepot.com. Be sure to watch out for shipping costs and minimum order requirements. These companies are mainly industrial suppliers, but will sell to individuals. There are probably many other sources on the internet.
There is a specialized hardware store in West Chester (and hundreds of locations around the country and internationally) that normally sells to contractors but may be a source for specialized fasteners of other hardware. Fastenal is located at 429 South Bolmar Street in West Chester and at www.fastenal.com.
If you are using metal connectors between pieces of wood (flat or bent sheet metal, not nails and screws) there are many types and sources. most hardware and home center stores sell plates, angles, and brackets which can be used for connecting wood together. Be sure that the items you select are of an appropriate material, strength, size, and corrosion resistance. The generic plates and angles sold in most stores in the hardware isle are not suitable for use outside, or in structural situations. Shelf brackets of various types are all designed for a certain size shelf and a certain maximum load. Be sure to select the correct parts and attach them properly.
One of the major manufacturers of connectors for structural use (joist hangers, post anchors, connector plates, etc.) is Simpson Strong-Tie. Their web site at www.strongtie.com has information about their products. You can also order or download free catalogs of information from the web site, which have a wealth of good information about materials and techniques. These items are often sold in large home centers in the building materials section. There are connectors intended for interior construction, exterior construction, pressure treated wood contact (see Pressure Treated Lumber above), and severe conditions (very wet, salt, chemical). Be sure you are selecting the correct materials. These connectors specify certain nails or screws that must be used to get the correct strength. Every hole in the connector should have the correct fastener in it, with no missed holes.
If you are using concrete, you can mix it by the bag, or have it delivered by truck, ready-mixed.
Ready mixed concrete is delivered by the cubic yard (27 cubic feet per cubic yard). Trucks can deliver from 4 to 10 cubic yards per load. Few Eagle projects need this amount of concrete. If you plan to get concrete this way, be sure you are really prepared to handle this material correctly. While it can be done with enough manpower and the correct tools, be sure you know what you are getting into. Once the truck starts pouring, the concrete must be placed (at 4000 pounds per cubic yard) and finished in a specific time frame. If you mess up, the result is very bad and very permanent.
Most Eagle Projects use smaller quantities mixed on site from bags. Note that you are using concrete (or mortar) mix, probably not cement. Portland cement is an ingredient in concrete and mortar. Concrete is a mixture of Portland Cement, sand, and aggregate (gravel and rocks of various sizes depending on what the concrete is for). Concrete gravel mix is available in several size bags usually from 40 pounds to 80 pounds per bag. Mortar also includes lime, and no gravel or rocks. It is used for putting bricks and blocks together. Read the bag carefully to find out how much each bag will make, typically 1/4 to 1/2 cubic foot per bag. Remember that if you need 10 bags of 80 pounds each, that is 800 pounds. You may need to go buy them in several trips to not overload your car.
As a general rule, it takes about 3600 pounds of dry concrete mix (90 bags of 40 pounds, 60 bags of 60 pounds, 45 bags of 80 pounds) to make a cubic yard (27 cubic feet, 46,656 cubic inches) of finished concrete. This does not include amounts for the concrete left stuck to tools, spilled, or in uncalculated spaces due to imperfect base preparation. This equates to about 133 pounds of concrete mix per cubic foot.
Use what you learned in geometry class to calculate the volume of concrete you need. Remember that a cubic foot is 1,728 cubic inches.
There are several types of mix available such as gravel mix, sand mix, mortar mix, fiber reinforced concrete mix, high tensile strength concrete mix, quick drying concrete mix, and others. Read and/or ask to be sure you know which is right for your application.
The amount of water is somewhat dependent on the type of mix and the humidity. Be sure you know how to recognize when the concrete is too wet or too dry. If you are carrying water in (not using a hose), you should have at least 1 1/2 gallons of water for every 100 pounds of concrete mix. DO NOT ADD THIS MUCH TO START. Start with under a gallon (8 pints) per 100 pounds of mix, and then add more as needed as you mix to get the correct consistency. Remember to adjust this amount for the size bags you will be using. In addition to this water you need to have water for cleaning tools and mixing containers before the concrete starts to set.
You should be able to describe when concrete has the correct amount of water in it. You will probably mix the concrete in a concrete tub or wheelbarrow using water from a bucket or hose. After you mix it up, do you need to add more water or more concrete mix? Read books, magazine articles, or internet sites, or talk to people who can help you answer this question. Generally if you smooth the surface with a shovel or trowel, you should not get liquid on the surface (too wet, add more concrete mix) and the concrete should not fissure like a glacier (too dry, add a LITTLE more water).
Be sure you know, and have or can get, the proper tools to work the concrete. You need to be prepared to clean the tools before the concrete starts to harden.
Concrete cures (a chemical process), rather than dries (a physical process). If strength is important to your application, know how to get the concrete to cure properly. This probably does not matter for concrete in a post hole, but is important for a sidewalk or floor. Concrete should be kept wet for up to a month if it is important to maximize the strength of the finished product. There are many web sites with information on how to do homeowner projects such as sidewalks, driveways, and floors.
Much of the available concrete mix comes from Quikrete®. Their web site is http://www.quikrete.com. This site has information about their various products and tips on using them in many types of homeowner and professional jobs.
Home Depot has a good page of information at https://www.homedepot.com/c/ab/types-of-concrete-mix-for-any-project/9ba683603be9fa5395fab901c07575fe.
Rebar (Concrete Reinforcing Rod)
This material is intended for reinforcing large pieces of concrete. It is available in diameters from 3/8" to 2" or larger. You will probably use 3/8" or 1/2" unless you are building a skyscraper or a major concrete and steel bridge. Few Eagle Projects use rebar for reinforcing concrete at all. It is usually used for putting together pieces of landscaping lumber such as retaining walls, or pinning timbers in place for landscaping edging.
You may be able to buy the length you need at home centers that sometimes sell 2' lengths. Steel suppliers sell it in 20' lengths. If you need to cut it, don't try to cut it with a hack saw unless you have many hack saw blades (for each cut) and lots of time. It is fairly easy to cut with a circular saw and a steel cutting blade. These blades are available at hardware stores and home centers for a few dollars.
Many Eagle projects include some form of posts set in the ground. These may be fence posts, sign posts, or posts to support decks, stairs, or other structures. In general posts should be set with the bottom below the frost line. In Chester County this is 30" to 36" below grade. For fence posts, 30" is probably deep enough. For most other applications, posts should be set 36" deep. In any case it is important that the sides of a post hole be straight. A tapered hole tends to cause the action of freezing and thawing to push the post up out of the ground.
Posts holes may be back-filled with dirt or concrete. Check with the organization you are working for to see if they have specific requirements. In general fence posts are backfilled with dirt, while posts supporting structures should be set in concrete. If backfilling with dirt, it is important to put the dirt in a few inches at a time and tamp the dirt down before adding more. This can be done with the tamping head on some digging bars, or the end of a scrap of 2 x 4. If using concrete, the end of the post should sit on dirt or rocks, not concrete, so that water in and around the wood can drain out the bottom. If the concrete runs all the way under the post, it forms a concrete "bowl" around the post causing it to sit in water at all times.
The amount of concrete needed for backfilling a hole can be calculated by estimating the volume of the hole (.785 x diameter x diameter x height if the hole is cylindrical) and subtracting the volume of the post (width x width x length of post in ground for square posts such as 4 x 4 or 6 x 6 posts). If measuring in inches, divide by 1728 to get cubic feet. Check with your math teacher if you need help with the geometry. Read the bags or signs at the store to see how much concrete each bag makes, or use the information on Concrete above..
If you are digging a hole or holes, be sure to figure out what you need and how to achieve it. What is the shape of the hole and what should it's dimensions be? How critical is the size and shape? What tools are to be used to dig the hole, such as a garden hand trowel (for a 6" deep hole for a small flower), post hole diggers (for post holes, 6" to 12" diameter or larger), long handled shovel (for tree holes, removing bushes, etc.), trenching shovel (trench for pipe or wire), cutter mattock (unbeatable for hard dirt, trenching, stump removal). Almost any digging project can benefit from a digging bar, since you WILL find rocks. Do you know how to use the tools? If you are not familiar with any of these tools, go to a hardware store or home center and look at them, ask how they are used, and read about them on the internet. Where will the tools come from (borrow, don't buy tools)? What will you do with the dirt (temporarily before refilling the hole, or permanent disposal)?
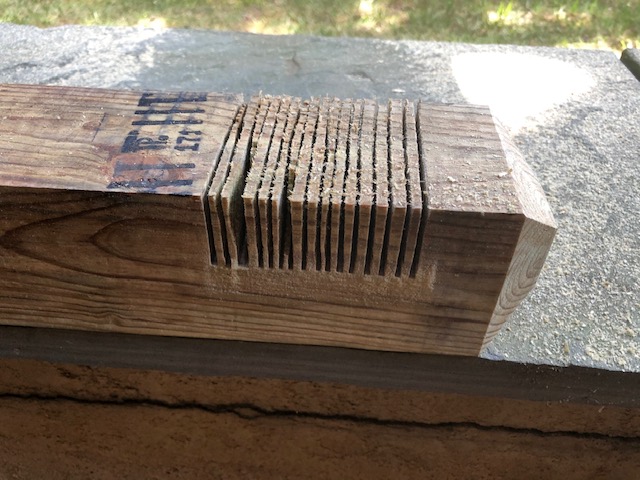
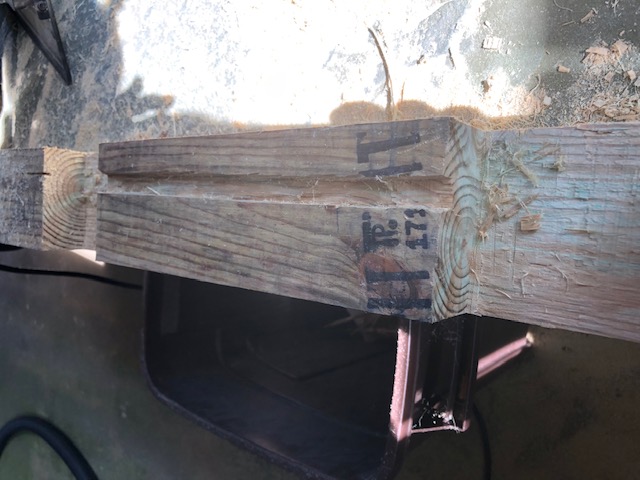
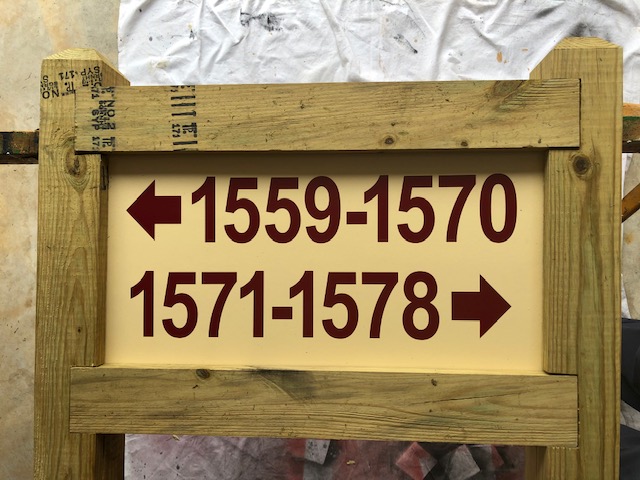
If you are making some kind of sign board or kiosk with two posts and a sign or bulletin board between, you probably should use dato joints. A dato joint makes a strong joint between the vertical posts and the horizontal pieces above and below the sign or bulletin board. The description here is not the only way to make dato joints, but is easy and can be done with fairly simple tools.
The illustrations below are from a small sign made with 4x4 posts and 4x4 cross pieces. The same thing can be done for larger signs with 6x6 posts and 6x6, 4x6, or 2x6 cross pieces.
In the design process, pay careful attention to allowances for depths and thickness. Leave some extra space for clearance around whatever will be used for the bulletin board or display case. Figure out where the cross pieces should intersect with the posts. Mark the posts for a 1 1/2" deep "dato pocket". With a circular saw, have an adult set the blade depth on a circular saw to the 1 1/2" depth and carefully cut the edges of the dato pocket. Use a square to be sure the edge cuts are exactly perpendicular to the edge. Then cut a series of groves across the place for the dato. It is better to make the dato slightly narrow rather than slightly wide. The final joint should be tight and it is easy to make it slightly wider later but impossible to make it narrower.
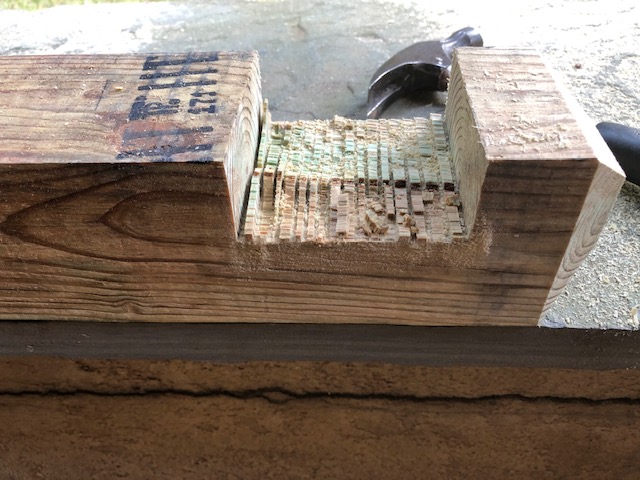
Now break out the pieces of wood with a hammer or a large screwdriver. They will break off easily.
With a hammer and chisel, clean the bottom of the dato.
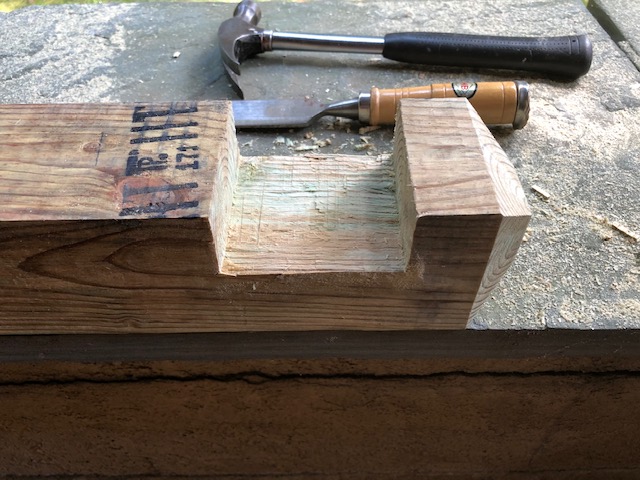
Test fit the cross piece into the dato. If it won't go in, use the circular saw to shave just a little off the side of the dato and try again. The cross piece should fit snugly. Cut and finish all four datos.
One of the best ways to mount a bulletin board, sign, or backing for a display case; is to cut a groove in the posts between the pockets and a similar groove in both cross pieces. The depth of the two grooves and the distance between the two posts after assembly or between the two cross pieces should be slightly more (about 1/8" to 1/4") than the size of the plywood to be mounted. The groove should be 1/2" to 3/4" deep. The grooves can be cut the same way as the pockets making sure that the distance from the back edge is exactly the same for all four pieces. Make the width of the groove slightly wider than the thickness of the plywood. Be sure to keep track of top, bottom, left and right pieces, and what is the inside/outside/top/bottom of each piece. It will matter once you start cutting pockets and grooves.
Another way to mount the backing plywood is to screw the plywood to the back of the posts and cross pieces. This saves cutting the groves and allows the plywood to be replaced in the future. Allow for as much overlap as possible over the posts and cross pieces so the screws are not close to the edges of the plywood. Screws close to the edge of plywood will break out over time and the plywood will fall off.
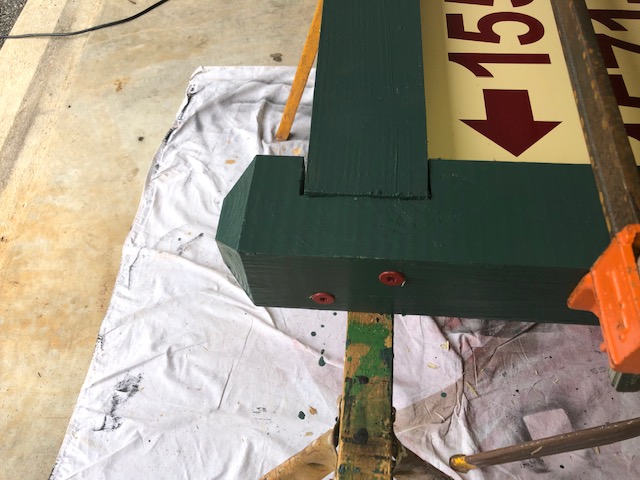
Once all the pieces are cut, trial fit them together. The cross pieces should go all the way into the pockets, and the plywood should fit slightly loosely.
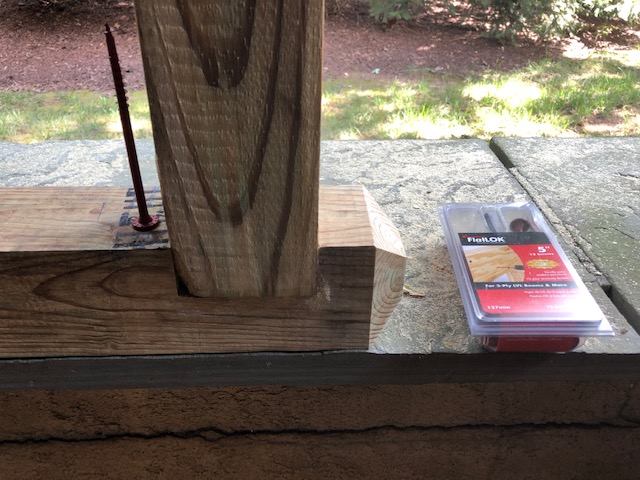
Once everything fits, you can paint or stain the wood before assembly if you want to. When ready for assembly, I recommend putting a bead of clear silicone calking around the edge of the plywood or in the bottom of the grooves. This helps seal the edges and keeps the plywood from moving but allows expansion and contraction. Once all the joints are all together, apply a clamp if you have one. Screw the joints together with 2 or 3 FlatLOK screws, 5" for 4x4, 6 3/4" for 6x6, in each joint. They come in a pack of 12 screws and a driver. An impact driver works great, but a large electric screwdriver will probably work as well. Be careful not to over drive them and strip the hole. Galvanized (not Zink plated) lag screws with flat washers can also be used, but are harder to install and not as clean looking.
Once the assembly is complete, it is ready to plant.
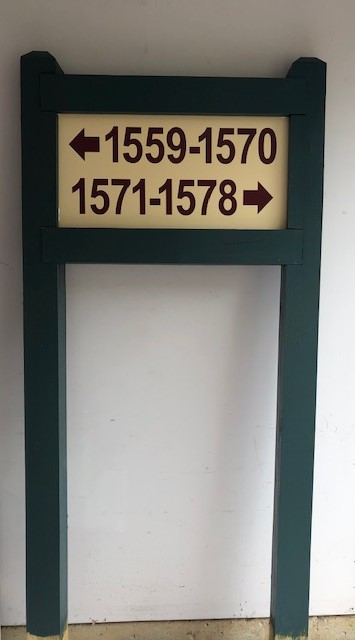
If a roof is planned, it probably should be assembled and mounted as a separate part after planting the posts since the entire sign with a roof will be very heavy. Even a 2' x 3' sign on 6x6 posts will be heavy to move and get vertical and into the holes. Be sure to plan how to lift the roof assembly, place it, and fasten it in place. It will be heavy. If the posts extend up above the sign, the roof framing can be carriage bolted through the posts.
You probably won't be roofing a house or large building as part of an Eagle Scout project but a sign kiosk is a common project and that often includes installing a shingle roof. If you have never done a shingle roof, it will take a little study before you are an expert ready to lead your project. The easiest way to learn is watching videos available on the internet about how to put on a shed roof (the closest thing to a kiosk roof). After you have built the structure with framing and a 3/8" or 1/2" CDX plywood deck, next comes the roofing process. Don't forget:
-
Roofing felt
-
Drip edge
-
Alignment chalk lines
-
Starter row
-
Alternating the rain slots
-
Proper nailing pattern
-
Overlapping the ridge at the top
-
Ridge cap
Each of these steps are explained in the videos. Most of the training videos go quickly, so if it your first time doing a roof you will need to watch them several times and stop to take notes along the way. You might even consider showing your workers one of the videos before they start work. Remember that for BSA safety rules, your youth workers can not be standing more than 4 feet above the ground. You may be able to roof a kiosk from ladders, or build the roof assembly separately and then lift it up on the posts after they are fixed in the ground.
Some possible videos to watch to help learn the process might be:
-
https://www.youtube.com/watch?v=YRciDPll_NY Good overview but very fast.
-
https://www.youtube.com/watch?v=t0wwu-jlY2M More detailed explanation of each step. Lots of good pointers. You will be using a hammer and loose roofing nails instead of an air nailer. Note that this installer is using a straight blade in his utility knife. Others like to use a hook blade. Either one works.
-
https://www.youtube.com/watch?v=TJaaDDuHJ1Y Over 45 minutes but he does a great job of teaching how to do each step. He shows a way of doing a roof without a drip edge but the extra work is probably not worth it. A drip edge is probably easier and I think it makes a better result. If you want to use his technique to get the overhang you could use a 1x2 to get a 3/4" overhang, which is probably enough for a kiosk.
-
https://www.youtube.com/watch?v=Qz5Nhmwx2mc This one is wooden (cedar) shingles done in a very simple way which is appropriate for a kiosk. Note that the shingles are not placed on plywood unless there is a ventilation layer on top of the roofing felt. Search for other videos if you want to try this technique. Skip this video if you are using asphalt shingles.
In addition to studying several videos, you should read the instructions that are on the packages of the specific products, particularly the shingles, that you will be using.
One thing to think about in your design, if the roof deck is no more than 5' 10" long you will be able to do each row with two shingles and still have enough for the overhang at the end. If the roof is 6' long you will need to use part of a third shingle on each row to have enough for the overhang and start with a part shingle to prevent having a narrow strip at the end of the first row.
If your roof is 24" on each side (a typical size for kiosks) you will probably need a starter row, 4 rows of normal shingles with the last one going over the top, and then the ridge cap.
Many landscaping projects involve mulch. In some cases if you are working for a township or park they may be able to provide you with mulch they make from chipped branches. In this case there will probably be no cost, but you will still need to calculate how much mulch you will need. Commercial sources of mulch have several types of mulch with different advantages and prices. Select the product that best meets your needs and budget. For playgrounds around swings and play toys, there are special mulches made with special concerns for safety.
For very small amounts you might buy the mulch by the bag which are probably about 2 cubic feet per bag (be sure to verify). Larger amounts can be picked up from dealers (any quantity) or delivered (about 3 yards to a small truck to 80-100 yards for a full tractor trailer load).
Mulch is normally measured in cubic yards. As you calculate the number of cubic yards you need remember that a cubic yard is 27 cubic feet, and that a cubic foot is 1728 cubic inches. Typically mulch is put down 2 to 4 inches thick. The thicker it is applied, the better a job it will do suppressing weeds and the longer it will last. Since your project probably does not include redoing the mulch every 6 months or every year, it is a good idea not to skimp on the amount.
When you get mulch delivered, the truck will dump it somewhere you designate. The best place is a paved parking lot close to where you want to use the mulch. If you have to have it dumped on gravel, dirt, or grass, you should probably put down a tarp so you can get it cleaned up when you are done. You will need to work out how to move it and spread it where you need it. The easiest way to pick up mulch from a pile is with forks (pitch fork, garden fork, spading fork). A square front shovel (scoop shovel, grain shovel, coal shovel, even a square snow shovel) is helpful for picking up the last part from a flat hard surface.
If you are planting plants, you will need to determine what species of plants you are going to plant, what size plant you are going to get, and where you are planting each plant. The organization you are working for may specify what types of plants they want. In other cases you may need to research what plants are most appropriate for your application. Many plants are available in various sizes. They may be sized by pot size (4" pot, 1 gallon, 3 gallon, ...), height (for trees), or caliper (diameter of tree trunk). The size makes a lot of difference in cost and how you need to handle them. A plot plan (map) is the best way to show in your plan where you plan to put each plant. Research books or talk to someone about how to determine the proper hole size, how to prepare the plant and hole, and how to plant the plant.
Will the plant need care after it is planted (water)? How will you do that and over what time period. In some cases the plant will need to be protected from animals or from falling over.
Remember that an Eagle Scout project should produce some significant result. Will the plants you are going to put in still be there several years from now? What will you do if some of the plants die?
If you are using wood, or many other materials, you will probably be using paint, stain, or other coatings. The most important thing is to read the label on the can. The can provides information on what uses the paint is appropriate for, how to apply it, tools, coverage rates, cleanup, and safety issues. You should be familiar with all this information in your planning. Be sure the product you select is compatible with the surface you are coating and the environment it will be used in. Will you be applying it with brushes (what size, material, style), rollers (what size and nap), or sprayer? The coverage information is always approximate. Unless you are using a custom mixed color, you probably could buy extra and return any you do not use. How many coats are recommended, and what sanding or other treatment should be done between coats. How much time (minimum and maximum) should pass between coats?
In selecting the appropriate paint or coating, here are a few generalizations. Pressure treated lumber is usually treated with semi-transparent stains made specifically for this lumber. Latex paint is usually easier to apply and cleanup than oil based paints. If the organization you are working for, or other pressing reason, requires oil based paint, be prepared for more careful planning for tools, application, cleanup, ventilation, and safety. The best clear finish is usually polyurethane for inside uses, or spar varnish if the item will be outside exposed to ultraviolet light (sunlight). These finishes are generally available in gloss, semi-gloss, satin, and eggshell finish. Most places that sell these finishes have samples to help you select the best finish to get the impression you want.
Be sure to include in your plans tarps, tape, newspaper, and other means for protecting things around and under where you are painting, even if that is your basement or driveway.
Some projects have involved pressure washers for cleaning weathered wood or stained masonry. Pressure washers are good for these applications and are fairly easy to use. Generally Scouts can be instructed in how to use them safely. It will take a little time to get a feel of how to make the tool work best. There are a few safety rules that must be enforced. Obviously no horseplay, and NEVER point a pressure discharge at any person. The user should be wearing closed shoes so their feet are not exposed. The water is discharged at 1500 to 6000 pounds per square inch, which can tear skin or inject water directly through the skin. Most nozzles can be adjusted or interchanged from a pencil point to a fan shape. In almost every case a fan shape should be used. The pencil point makes it very easy to damage what is being cleaned. Remember that high pressure water is used for quarrying marble and cutting metal. The closer the nozzle is to the work the smaller an area is cleaned, but the more power the cleaner has on that small area. Typically work about 6 inches from the surface. If used on wood, it is very easy to "fur" the wood by tearing loose fibers, requiring the wood to be sanded to restore its surface.
In estimating how long the cleaning project will take, a very rough estimate is about 1 square foot per minute per 1000 "cleaning units" where "cleaning units" is the product of the pressure in PSI and the flow in GPM (both will be shown on the unit even if the "cleaning units" measurement is not. This is a very rough estimate and will vary based on the surface being cleaned, what has to be removed, how dirty the surface is, and the skill and consistency of the operator.
Pressure washers can be rented from almost any tool rental store, or borrowed from someone who owns one. The gasoline powered units will do much more cleaning work that an electric unit. Electric powered units are usually less than 3000 "cleaning units" while gasoline powered units run up to almost 40,000 "cleaning units". Stationary units can exceed 300,000 "cleaning units". Anything over 8000 "cleaning units" is intended for professional use and should not be attempted by Scouts due to the nozzle reaction and risk of damage.
Some pressure washers heat the water. Unless you are cleaning grease, you probably do not need this feature. These units are also more dangerous to use since they involve a burner to generate the heat to heat the water. Never attempt to use a unit that produces steam as these can be very dangerous unless used by a professional.
Almost any pressure washer requires a water source from a garden hose. Electric units also require electricity and so can only be used close to a building or with a generator. If you have to use an extension cord it should be heavy duty, at least 14 gauge (smaller numbers are heavier in wire gauge).
Age Guidelines for Tool Use and Work Elevations or Excavations
The Boy Scouts have recently released new guidelines on use of tools and working at elevations. These policies should be reviewed to see what restrictions apply to your project. They can be downloaded at http://www.scouting.org/filestore/healthsafety/pdf/680-028.pdf. There is also safety information in the Guide to Safe Scouting at http://www.scouting.org/scoutsource/HealthandSafety/GSS/toc.aspx for the latest information.
Power saws of all kinds should be operated by adults. It is too easy to cause severe injury with these tools to allow Scouts to use them. Scouts should do the layout and marking of wood to be cut, and then hand it to an adult (the owner of the saw if possible) to do the actual cutting.
Most other tools can be safely used by Scouts with proper instruction. Be sure that you are familiar with how to use the tool properly and safely so you can direct your workers. Select the Scouts to use power tools with their ability and maturity in mind. Check the reference above for the official Boy Scout policy for specific tools and ages
Some troops have more restrictive policies on the use of power tools by Scouts. If you are not sure, ask your Eagle adviser or Scoutmaster.
If you are using an electric power tool, be sure you have a source of electricity within reach. Avoid long extension cords. If you must use an extension cord, be sure that it is heavy enough for the current required AND THE DISTANCE. There is a chart at https://www.thespruce.com/extension-cord-chart-1152866 giving the size wire required for a given load and distance.
If you are using some form or rock, gravel, or sand, you will need to determine and specify exactly what material you need, how much you need, and determine how to get it to your site. You can not call up a quarry and say "Please deliver some gravel to my project." You first need to determine what material you need. Gravel comes in many sizes and mixes of sizes. For some things you want a consistent size, such as 3/4" gravel (2B). This allows for water to drain through the gravel bed. For other projects you want a mix of sizes so the gaps between the larger pieces are filled in to make a more stable surface, such as 3A Modified which is everything from 2 1/2" stones down to dust and will pack into a very solid base.
Probably the most common stone materials for use in Eagle Scout projects are 2A Modified (compacts to a rigid base for underlaying walks and patios), 2B gravel (drainage), sand or screenings (bed for laying walks and patios), and possibly 3" to 6" stone for erosion control.
Transporting sand and gravel both from the supplier to your project location, and from a supply pile to the job, involves significant effort due to the weight and volume of the material. If you are going to pick up the sand or gravel at a supplier, be sure to take into account the weight you are transporting. Any car, truck, or trailer has a limit to how much weight it can transport. Do not overload a vehicle. When moving material on-site, you may be able to put 2 to 6 cubic feet of material in a wheelbarrow, but can you then move it, particularly if it has to go up hill? In planning the effort, determine how long and how many people it takes to load the wheelbarrow, move it to the job, and empty (dump?) it.
Be sure to order enough for your job. It is hard to determine the exact amount you will use and you do not want to run short. Be sure to have a plan for what to do with any left over material.
The following chart lists the materials available from one supplier. Not every supplier will have the same selection, or necessarily use the same terms.
| Stone (sorted smallest to largest by size) | Description | Uses |
| Anti-Skid | 1/4" clean stone | Under concrete, Top-dress driveways, Skid resistance in winter. |
| Rice | 1/4" clean stone | 1/4" clean stone |
| #10 | 1/4" screenings | Ralumac, Blacktop covering |
| #9 | Clean 1/4" washed | Skin patching, Anti-skid |
| 1B | 1/2" clean stone | Under concrete, Top-dress driveways |
| 1B Modified | 1/2" modified | Top-dress driveways |
| #8 | State-approved 1/2" clean stone | Oil and chip, Under concrete |
| #7 | 5/8" clean stone | Precast concrete |
| #67 | 3/4" clean | Under concrete |
| 2B | 3/4" clean | Under concrete |
| 1" | 1" clean stone | Under concrete |
| Dirty Chips | 1" to dirt | Fill |
| 2A-Modified | 1" to sand | Top-dress parking areas |
| 2RC | Dirty chips and 2A Modified mixed | Top-dress driveways, Fill |
| 2B Special | 1 1/8" clean stone | Sewer stone, Under concrete |
| #57 | 1 1/2", 3/4", 1/2" mix | Under concrete, Sewer stone |
| #5 | State approved 1 1/2" clean stone | Sewer stone |
| 3A Modified | 2 1/2" to sand | Base stone |
| 3A-Modified Special | Dirty 3A Modified | Base stone, Fill |
| #3 | 3" Ballast | Driveway base |
| 4A-Modified | 4" mixed with sand | Base for driveways |
| #1 | 4" Ballast | Tire scrubbers, Driveway base |
| R-3 | 3" to 6" Rip Rap | Tire scrubbers, Water control |
| R-4 | 6" to 12" Rip Rap | Erosion control |
| R-5 | 9" to 18" Rip Rap | Erosion control |
| R-6 | 12" to 24" Rip Rap | Erosion control |
| R-7 | 18" to 30" Rip Rap | Erosion control |
It should be clear from the above table that you need to talk to a supplier or other expert about what material you need to use for your specific application.
Sand is also available in various forms. Some is smooth, fine, and uniformly sized for sand boxes (sold as play sand). Other sand is courser, or sharp (made by crushing rock), or in various colors. Be sure that you select the correct product for your application.
This information might be useful. When dumped in a pile, any given material will form a specific slope on the side of the pile (called Angle of Repose). This determines the relationship between height and diameter of a pile. It also determines the minimum angle required to slide the material down a slope.
| Material | Typical Angle of Repose |
| Clay | 45 |
| Earth, loose | 28 |
| Earth, compact | 50 |
| Gravel | 40 |
| Sand, dry | 35 |
| Sand, damp | 40 |
| Sand, with crushed stone | 27 |
| Stone | 30 |
| Stone, broken | 27 |
| Stone, crushed | 30 |
There are many web sites and other sources of information on installation of patios and sidewalks. The process is basically the same for various types of paving surface. The base preparation is critical to the finished result. Be sure you know and understand how this process works. Visit a supplier that does installations and talk with the professionals. If possible, watch the process being done by professionals as part of your planning process. The information below is based on information from several professional sources. Always consult literature provided by the paver supplier.
Step 1 Planning
Start with a good level and tape measure. Measure and draw a diagram of
the area you want to pave, noting any existing structures such as
buildings, fences and other paved areas. Carefully measure
dimensions so you can determine what materials you will need.
Measure the existing grade (slope) and determine what grade you want on
your finished surface. Select the paving material. You may
want to consider a contrasting color for the edge. At walkways
that end at a street, special pavers with truncated domes to warn
visually impaired walkers are required by ADA requirements. Check
with your supplier for ideas and available materials. If there
are few curves and no boarder, get 5% more than the square
footage. Use 10% for more complex designs. In estimating
the amount of base stone, remember that you buy it un-compacted but the
final measurements are for compacted volume. 2A modified will
compact about 15-25%.
Do not attempt to use frozen stone, frozen sand, or lay the base over frozen ground. Start earlier or wait until spring.
Step 2 Preparing
Contact your local utility companies before you begin excavation (call
811 3-10 days before you dig). Stake out an area approximately 12”
larger than the area to be paved. Plan to slope the paving away from
the buildings in the direction of normal drainage. Make sure that you
have 90º corners at your starting point. You can do this by using the
3-4-5 triangle method. From the corner stake measure 3’ across the base
and 4’ up the side. The diagonal line joining these two points should
be 5’. If it is not, adjust the 4’ side until the diagonal is exactly
5’.
Step 3 Excavating
Where there is only pedestrian traffic, a base of 4”-6” of processed
gravel is recommended. To achieve this, excavate 7”-9” to allow for
base material, sand and pavers. Where there will be vehicular traffic
or around pools a base of 6”-8” of processed gravel is recommended. To
achieve this, excavate 9”-11” deep. In very wet or soft soil as
much as 12" of gravel base may be needed even for pedestrian
traffic. Make sure to excavate 8" to 12” beyond the area you plan
to pave. The excavation should be sloped the same as the finished
pavement Most pavements are sloped at 1% to 2% or 1/8" to 1/4"
per every foot, this will allow the patio to drain properly.
Determine what slope you will use and the direction of the slope to
insure proper water drainage, and based on existing grades.
Install a level line across the area using a line level. On the stake
that is at the end you want to slope towards, move the line down 1/8"
to 1/4" for every foot of distance between the stakes. For example, if
the stakes are 8' apart, move the string down 1" to 2”. Measure the
distance from the line to the bottom of the excavation. The distance
should be equal all along the line. Repeat with as many strings as
necessary. Mark the stakes and remove the string from one end
while you are working, but reinstall to check grade at each step of the
process. Be sure your finished pavers will match exactly to any
existing door sill, walkways, or other existing surface so you do not
produce a tripping hazard.
Step 4 Installing the Base
Compact the surface of the excavated soil with a vibrating plate
compactor (you can rent these). Install SEPARATION FABRIC (sometimes
called Geo-Textile cloth) over the compacted base. DO NOT SKIP
THIS STEP. Do not use landscape cloth or weed barrier as these
are not intended for permanent installations and will not serve the
function. This material should be available from the supplier
selling you the paving material, or check with other paving material
suppliers.
The primary cause for installation failure on a job is the contractor or home owner convincing themselves that the existing base “Won’t Go anywhere”.
Fill the area with 2A Modified stone, approximately 3” thick. Compact this with the vibrating plate compactor. Wetting the gravel lightly with water will help with the compacting. When you can walk on the gravel without causing an indentation you can add the next layer of gravel and compact it. Continue to add gravel in layers until the base is approximately 1" below the bottom of the finished pavers (3" from the finished grade for 2" pavers), usually about 6” of un-compacted 2A Modified. This is your last chance to check and adjust the grade of the project. Test using the strings described above and add or remove material and compact until the surface is flat, properly graded, and at the correct height. This step is the most critical step in making the finished surface be uniform and having a surface that will stay flat.
Step 5 Installing the Restraints
Edge restraints should always be used to prevent the pavers from
rolling or spreading. You can use PVC (plastic) edging which are
recommended because they are easy to install, very durable and are
priced well in comparison to concrete. Edge restraints of steel and
aluminum are also available. Use the 3-4-5 triangle method to
make sure that all corners are exactly 90º. If the far edge location
does not have to be exact, you may want to wait until you have laid all
but the last row and place the edge restraints so you do not need to
cut the edge pavers. Edge restraints are always held in place,
typically by spikes driven into the compacted stone base.
Step 6 Laying the Bedding Sand
Before you can lay the pavers, a bed of sand must be prepared. Concrete
sand is recommended instead of bar sand or screenings. Concrete
sand forms a better “Interlock” between the pavers. Use 1”
outside diameter galvanized electrical conduit (make sure they are
straight) or 3/4" (1" outside diameter) PVC pipe and place them
2’ to 3’ apart down the area to be paved. These pipes form rails for
the screed board. Measure the distance from the string lines and the
screed rails at several points. If necessary, adjust the height of the
rails by putting sand under them or trimming the base underneath if too
high. Shovel sand onto the rails until it is slightly higher than
the rails. Use a 2 x 4 or 2 x 6 screed board to drag across the top to
smooth and level the surface. Move the screed board back and forth as
you drag it down the rails to make a level smooth surface. Fill in the
low spots and repeat if necessary. Remove the rails, fill in the
indentations with sand, and trowel smooth as you are laying the pavers.
Do not step on, compact or wet the sand after you have finished
screening. If it starts to rain before laying the pavers, “WAIT” !! The sand must be dry to compact properly.
The sand bed can be done in sections ahead of laying pavers. Do
not prepare more sand bed than you can lay pavers the same day.
Step 7 Layering Pavers
Starting in a 90º corner, lay the pavers in the pattern you have
chosen. Work outwards keeping all joint lines straight. Use string
lines pulled along joint lines and parallel to the edge restraints or,
chalk lines snapped on the surface of the sand bed to keep the joint
lines straight. Leave a 1/16" to 1/8” space between pavers, but keep
the spaces even. Some pavers have bumps on them to control the
spaces. Periodically check the alignment of the rows by stringing a
line along the front edge of the leading row. Each paver should touch
the string. If adjustment is needed use a screwdriver and hammer to
move it into place. Work off the pavers you have already installed but
stay away from the edge so you do not disturb the sand bed. Install
remaining edge restraints. Do not try to turn the pavers with curves in
your laying pattern. Cut pavers to fit along the edge restraints.
Step 8 Cutting Pavers
Measure and mark the pavers to be cut with a marking crayon. A diamond
blade wet saw, guillotine paver splitter or a hammer and chisel can be
used to cut pavers. Always wear safety glasses. If possible, keep edge
stones to one half paver.
Step 9 Compacting & Setting
Sweep the surface to remove any debris. Spread masonry sand over the
surface, sweeping it into the joints leaving surplus sand on the
pavers. Tamp the pavers down using the vibrating plate compactor. Keep
a layer of excess sand on the pavers to cushion the surface and protect
the pavers, or put a layer of cardboard on the bottom of the plate
compactor for protection (it will need to be replaced
frequently). The vibration will settle the pavers into the sand
and the vibration will assist in filling the joints. Spread more
masonry sand if required. Make two or three passes at 90º to each other
and re-sweep the surface.
There are products available for filling between pavers that harden somewhat and help prevent washout and weeds. Talk to your paver supplier about what products may be available.
Step 10 Finishing
Sweep the remaining excess dry sand over the surface filling the
joints. You will have to repeat this over the next few days as the sand
settles and the rain compacts it. Fill the remaining area around
the finished patio with dirt and replant grass.
If you need to move or transport materials, or your completed project, it might be important to know what it will weigh. The following list gives some very approximate weights for some materials you may be using. You will need to calculate the volume in cubic feet (1 cubic foot = 1728 cubic inches).
| Material | Approximate Weight in Pounds per Cubic Foot |
| Dry Lumber (softwoods) | 30 |
| Dry Lumber (hardwoods) | 50 |
| Pressure Treated Lumber | 55 |
| Plywood | 40 |
| Rock (solid) | 165 |
| Gravel or sand, dry | 100 |
| Sand, wet | 120 |
| Water | 62.4 |
| Mulch (root, wood, or bark) | 20 |
| Rubber nugget mulch | 34 |
| Steel | 490 |
| Aluminum | 165 |
| Concrete | 150 |
| Plastic (varies widely) | 50-110 |
| Dirt | 100 |
Most of you have studied algebra, geometry, and trigonometry; but some may have forgotten what you learned. Many Eagle projects require some mathematics to plan, at least addition, subtraction, multiplication, division, and fractions from elementary school. If you remember these skills, thank your elementary school teacher. If not, go back to them and apologize and ask for help. If you need more help on High School math than is provided here, ask your friend who is good at math, or your present or former math teacher.
If you have forgotten your geometry formulas, here are some that may be useful:
Volume of a rectangular solid (such as a piece of lumber or area of mulch): Volume = Length x Width x Height
Volume of a cylinder (such as a post hole): Volume = πr2h = 0.79 x Diameter x Diameter x Height
Volume of a cone (such as a pile conical pile of sand): Volume = πr2h/3 = 0.26 x Diameter x Diameter x Height
Area of a right triangle: Area = 1/2 x a x b where a and b are the perpendicular sides
If you have forgotten your trigonometry formulas, here are some that may be useful, in a right triangle with perpendicular sides a and b, hypotenuse h:
a2 + b2 = h2 (Pythagorean theorem)
Angle at the corner of a right triangle: Angle = ArcTangent (Opposite side / Adjacent side)
Angle at the corner of a right triangle: Angle = ArcSine (Opposite side / Hypotenuse)
Angle at the corner of a right triangle: Angle = ArcCosine (Adjacent side / Hypotenuse)
Sum of the angles in a triangle = 180° (One corner is 90° in a right triangle)
Sometimes a map is useful to describe the area where you will be working, where the project is located, or to describe to your workers how to get to the project site. Check out www.mapquest.com/maps/ or www.google.com/maps. Enter the location information and zoom in until you have the right area. You can put it into your project proposal by typing Crtl-C to copy it to the clipboard, go to your word processor, and type Ctrl-V to paste. Use the Crop function to get rid of the rest of the screen image. Look up CROP in HELP if you are not sure how to do this.
If you are building something, you do not always have to develop the plans from scratch. You may be able to buy plans or download them from the Internet. This is OK as long as you thoroughly understand them and can explain to your workers how to make them work. You will probably need to fill in additional detail in the instructions since your workers are not skilled carpenters. Be sure that you can explain how each piece gets made, what raw (purchased) material it is made from, what tools and techniques are needed, and that you have the tools needed. Many plans available on the internet may assume skills and tools that you may not have. Do not expect your workers to extract the cutting list or materials list from an assembly diagram. Be sure that the materials suggested are actually available locally. Be sure that the plans you are looking at are really for what you want to build, and that the tools, materials, and techniques are all appropriate. They also typically assume a "do-it-yourself project", not a "lead others in doing the project" so some changes may be appropriate. If the plans make references to tools or techniques that you are not familiar with, you need to do more studying, or find simpler plans.
Many plans on the internet are informal or designed for light duty home use and may not be appropriate for following exactly or use in public spaces. Look for tells that the plans are not accurate, such as dimensions assuming dimensional lumber is 1", 2", 4", 6", thick or wide. See Lumber above. If the plans do not use real, available, sizes you should find better plans. Any load bearing joints in benches, picnic tables, and such should use bolts for the load carrying joints not screws and nails. Remember that you can not control how these projects will be used and abused when placed in a public space. Many internet plans assume knowledge, skills, and tools that may be beyond your abilities. Hidden pocket screws, dovetail joints, and tools that you do not have may be indications that these are the wrong set of plans for you.
Remember that the requirement for an Eagle Scout project requires you to plan and develop the project, as well as give leadership to carrying it out. If you really get a complete set of detailed plans for exactly what you need to build from the internet, or by buying them, be sure you have a good answer to the question of what you are doing in these areas for your project.
Building Permits and Approvals
The requirements for building permits and municipal approvals varies widely from location to location. Many projects that have safety risks associated with them, requirements in the building code, or change the value of the property will require a building permit. This would include decks, stairs, sheds, and ramps, but probably not book shelves. If there is any question, it is always a good idea to contact your township, borough, or city building inspector or codes enforcement officer. These people are also a wealth of information about building techniques and can be a good resource even if no permit is required. You certainly do not want to get into a situation where your project is underway, or completed, and the building inspector comes along and fines you for failure to have a permit or even worse, requires you to tear down or modify part of what you have built. It has happened. For most Eagle Scout projects for charitable organizations there would be little or no fee for any required permits. The inspector may want to inspect your project at specific points along the way. Ask for details and be sure to incorporate this in your schedule planning. The organization you are doing the project for will generally assist in getting any needed permits, but check to be sure.
As you plan your work days, you will need to recruit a labor force. By Boy Scout definitions, you must be leading a crew of at least two others to qualify as you providing the Leadership to the project. For each work session planned, you should determine the correct number of people you need and then work to recruit that number of helpers. You should get specific commitments from specific people. It generally does not work to just put out an announcement that you will be working on your project on a certain day and invite anyone interested and willing to come. You are likely to be alone. In determining the best crew size, there are several considerations to look at:
-
How large a crew do you need for any specific task to be accomplished that day. For example, if you need to lift and move something large or heavy, how many people must you have to lift it?
-
How many tasks or work assignments do you have that can be done simultaneously. Do not recruit more people than you can keep busy working on the project.
-
How many tools or supplies can you get? If your workers need a tool to do the work be sure you have enough tools for all your workers to keep working. Better to have an excess of tools.
-
How much space do you have? While this is not always an issue, if the work has to be done in a small space, such as painting a small room, don't have more people than can easily work in the space without running into each other.
-
How many people can you supervise? The more complex the tasks or the more inexperienced your workforce, the more of your time will be needed to keep everyone working on task and doing the job correctly. Your skill in managing people and projects is also a consideration. A crew of 2-4 (plus 2 adults for safety and to run dangerous power tools) might be as much as you can manage for fairly complex and unique fabrication and construction, while you might be able to manage 15-20 on a large trail clearing project (if you have enough tools)
Once you have determined your desired crew size and recruited them, it is a good idea to call each one the night before to remind them:
-
That they said they would come
-
When (start and finish)
-
Where
-
The type of work they will be doing
-
How to dress
-
Anything you are expecting them to bring, such as tools
-
Food (bribes) to be provided
-
Transportation arrangements
-
Anything else you think they should know
Many organizations like Scouts to build them picnic tables. If you are going to build picnic tables, you should build at least 6 to make enough of a project. Even 12 or 14 tables is not too big since once you get set up the process goes quickly to mass produce them. If the organization does not need this many, you may need to look for additional scope to add to the project, or build picnic tables for more than one organization at the same time. Once you have the design and process worked out, they can be mass assembled without much effort.
In most cases the legs and the diagonal braces from the table top to the leg trestles are the hardest pieces to make. Be sure you have a good description of what you want to create, and how to make the pieces with the correct angles. This applies to each piece of the table, but pieces with angles on the ends need the most details about how to fabricate them. A diagram with all dimensions for each individual piece is often a good way to describe how to make any piece that is not just a square cut from a piece of lumber.
If you need to build handicapped accessible tables, consider making some with 10' top boards instead of 8', with the extra 2' on one end. This is much easier than the design with 3 sets of legs and half of the bench left off on one side, and is much more useful in the majority of times when the table is being used by people not in a wheelchair. The extra top surface is very useful for serving dishes and coolers when not needed for someone in a wheelchair.
Remember that when the table gets moved, it will be lifted by seats or table top. Be sure the fastening of these parts will withstand the force even after the wood has dried and checked (cracked) as it weathers over the years. These should probably be fastened down with at least 3" or 3 1/2" screws.
Since you will be building "Public" picnic tables, destined for parks, schools, or other public places, be sure you are using an appropriate design. Unless the benefiting organization has a specific space restriction, generally they should be 8' picnic tables. Plans for 5' or 6' tables are generally intended for home use. Remember that these tables will be subject to heavy use and abuse, so should be built to last. Legs and seat supports should be 2 x 6, not 2 x 4. Each connection to the legs (2 connections on each of 4 legs) should be made with 2 carriage bolts (3/8" diameter or larger) at each connection, not screws. If you are looking at a design that is not designed with this type of use in mind, find another design. Putting a picnic table designed for home use in a public setting is a waste of time and money because it will not last, and it puts you and the benefiting organization at risk of liability when it fails.
There
is always a need for food at various food banks and food cupboards.
There are about 40 food distribution agencies in Chester County alone.
The typical method is to place door hangers on doors (NOT in mailboxes,
that is against the law) one weekend and then collect food from front
doorsteps the next weekend. Scouting America runs a nationwide food
collection annually in November. Participating on one of these drives
with your troop is a good way to learn how these drives work. Scouting
for Food cannot be your Eagle project but is a good learning
experience. Your food drive should not compete for workers or food donations with this national food drive.
When
planning your project, you should probably look at covering
neighborhoods totaling about 1000-1500 homes or more. This sounds like
a lot, but you will be surprised how quickly the houses get covered. To
reduce the distances, you may want to select neighborhoods with houses
on less than 1 acre lots. To make both the distribution and pickup
process go efficiently, prepare maps of the neighborhood for a group to
cover with a route laid out that covers every house but minimizes
retracing steps. Google maps is a great resource to prepare customized
maps.
The
distribution process goes very quickly because a team of Scouts can
carry door hangers for all their houses and just walk from house to
house. Since it is always possible that you will have to reschedule
because of weather (be sure you have looked at the weather for both
days before finalizing the dates), you probably should date the door
hangers with the collection date by hand or using an inexpensive
self-inking date stamp ($10-$15). Check with the printer as a stamp may
not work well on glossy paper. Be sure the door hanger says when (date
and starting time) you will be picking up the food. The door hanger
should describe what food you are looking for (check with the
beneficiary) and who it is for (Eagle Scout project and where the food
is going).
The food pickup process takes more time, since your workers will have to carry the donated food from front doors to a car working with them. You will also need to plan for a car and adult driver for about every 2-4 runners. Do not expect food donations at every house. A good food drive may get close to an average of 1 pound of food per house solicited, although this number varies widely.
Be
sure you have a plan for how to deliver the food to the beneficiary.
They may want the food sorted, checked for expiration date, or boxed;
or they may do all this after you deliver it. In any case you will
probably have multiple carloads to deliver to the beneficiary.
Eagle Scout projects sometimes involve construction or refurbishment of trails in township parts or other locations. The work will depend greatly on the pre-existing conditions. Sometimes the work involves just clearing some obstructions such as downed trees, or marking a trail across fairly open areas. In other cases, significant ground work is required. The organization you are doing the work for will probably have ideas about what they want.
Be sure to consider overhead clearing as well as work on the ground. Make allowances for the fact that branches will grow, and rain or snow will cause branches to droop. If horses, bicycles, or vehicles will use the trail in addition to pedestrians, a larger space must be cleared. In marking the trail, be sure not to injure trees, and in open spaces of trails with mowed grass, do not create obstacles for maintenance crews to have to mow around.
All trails should consider water management and erosion. The steeper the slope the more important this becomes. Water bars may be required to control water flow and push water off of the trail.
If the trail is to be used by pedestrians only, steps may be used to go up steep slopes, especially for short distances.
If water must be crossed, some form of bridge needs to be provided. It needs to have a firm foundation (usually posts set well back from the water) and railings if it is more than about 18" above the ground (water). Marshy areas can be traversed with wooden walkways that sit on the ground but provide elevated walkways for pedestrians. Be sure to consider what happens in rain or flood conditions.
Although probably more sophisticated than the trails involved in Eagle Scout projects, some interesting information on how trails are constructed in State and National parks can be found at:
Whitemarsh Township (Montgomery County, PA) http://www.whitemarshtwp.org/documentcenter/view/175
Pennsylvania Trail Design & Development Principles https://conservationtools.org/library_items/1242/files/1141.
U.S. Forest Service Standards https://www.fs.usda.gov/managing-land/trails/trail-management-tools/trailplans.
Aerial Photographs and Topographic Maps
In a few cases an aerial photograph or topographic map might be useful. You can get either by going to http://mapper.acme.com. In most cases the easiest way to get close is to enter a zip code and click Find. It will also accept a street address or latitude/longitude. You can drag the image with the mouse. The "+" and "-" keys or the mouse roller change the zoom level. The buttons at the top select Map (roads), Satellite (aerial photographs with map overlaid), Topo (topographic map), and another aerial photograph source. You can print the map or image selected. Use the PrtScr to copy the screen image to the clipboard and then paste the image into your document and crop it.
Some aerial photographs and topographic maps may also be available from http://www.terraserver.com and http://maps.google.com. These are the data sources for mapper.acme.com.
If you want to download topographic maps and then use them for research (how far is it to get to my project site, or how much up/down hill) or to cut and incorporate them into your proposal, go to www.pickatrail.com and under Download Free Topo Maps, click on Topo Maps are Free. This will take you to a map of the United States. Click, Drag, and zoom down until you are close to the area you want. Click Submit and a page will come up that identifies the correct quadrangle and the surrounding 8 quadrangles. Typically there are several versions of different dates. At least in some cases the Current version is a PDF file including multiple layers that can be turned on and off.